shin™
Promoter


Posts : 48
Age : 31
Location : Near your house
Mood : moody ako!! :D
> : I love Sacred HOT
Contribution : Forum Warnings :
Reg. Date : 2009-09-02
Reputation : 5
Points : 27091
 |  Subject: Create a Surreal Photo Manipulation with Twisting Water. Subject: Create a Surreal Photo Manipulation with Twisting Water.  Wed Sep 02, 2009 11:49 pm Wed Sep 02, 2009 11:49 pm | |
| This is my first time here,
delete this thread if already posted..
thank you.. 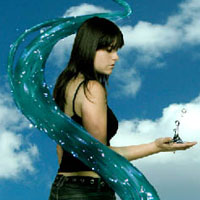
In this tutorial, we're going to create a fantasy photo manipulation mixing different images and learning to use and modify the stock images in a creative way. The idea is to get a compact image that looks absolutely real, and at the same time, absolutely impossible!
Final Image Preview
Take a look at the image we'll be creating. Want access to the full PSD files and downloadable copies of every tutorial, including this one? Join Psd Plus for just $9/month. You can view the final image preview below.
- Spoiler:
Step 1
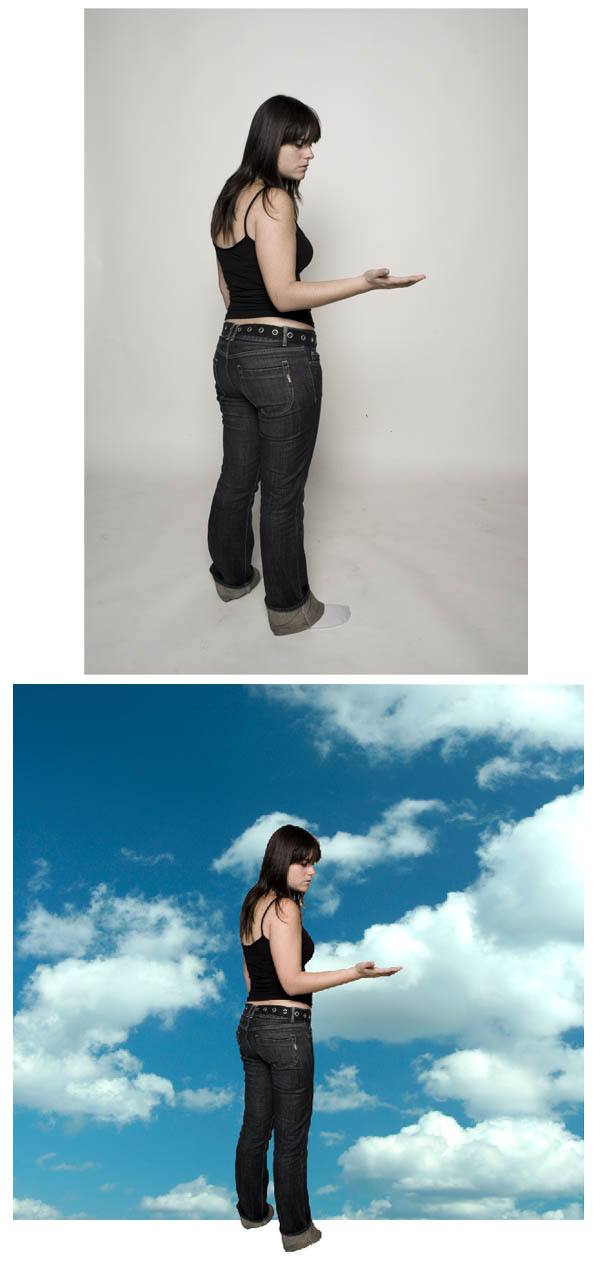
Start with an empty document (mine is 40cm by 50cm at 240 dpi) and one beautiful sky pic for the background. I used my own image for this, which is in the download for Psd Plus members, though you can certainly search stock sites for a good sky image as well.
- Spoiler:
Step 2
Apply Color Balance (Image > Adjustments > Color Balance) to add blue and cyan using the settings shown below.
- Spoiler:
Step 3
Let's add the girl. It's a personal photograph of mine and is included in the download for Psd Plus members. I captured the model in natural light and is easy to reproduce. You can always use your own image or stock image though. Cut it out with your favorite tool from the original picture and paste it in our main document (don't worry about feet, we don't need them). Place the image in the center.
- Spoiler:
Step 4
Now we are going to modify the color on the girl. Go to Color Balance again (Image > Adjustments > Color Balance) and use the adjustments shown below.
- Spoiler:
Step 5
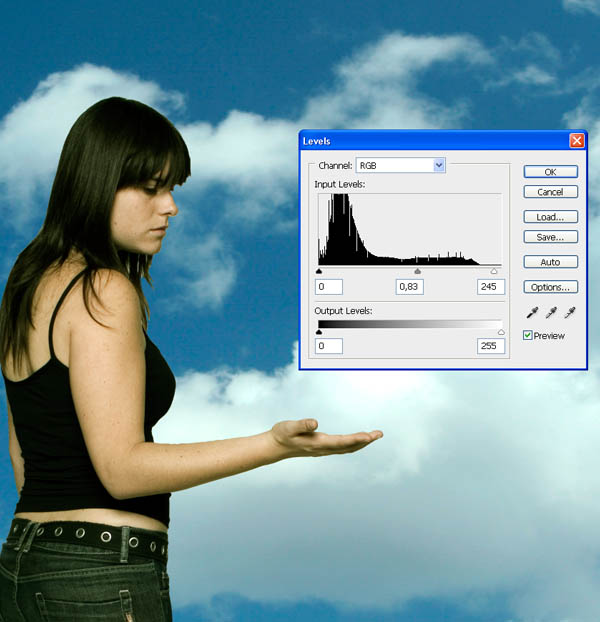
Let's add some levels next. Go to Image > Adjustments > Levels and apply the following adjustments.
- Spoiler:
Step 6
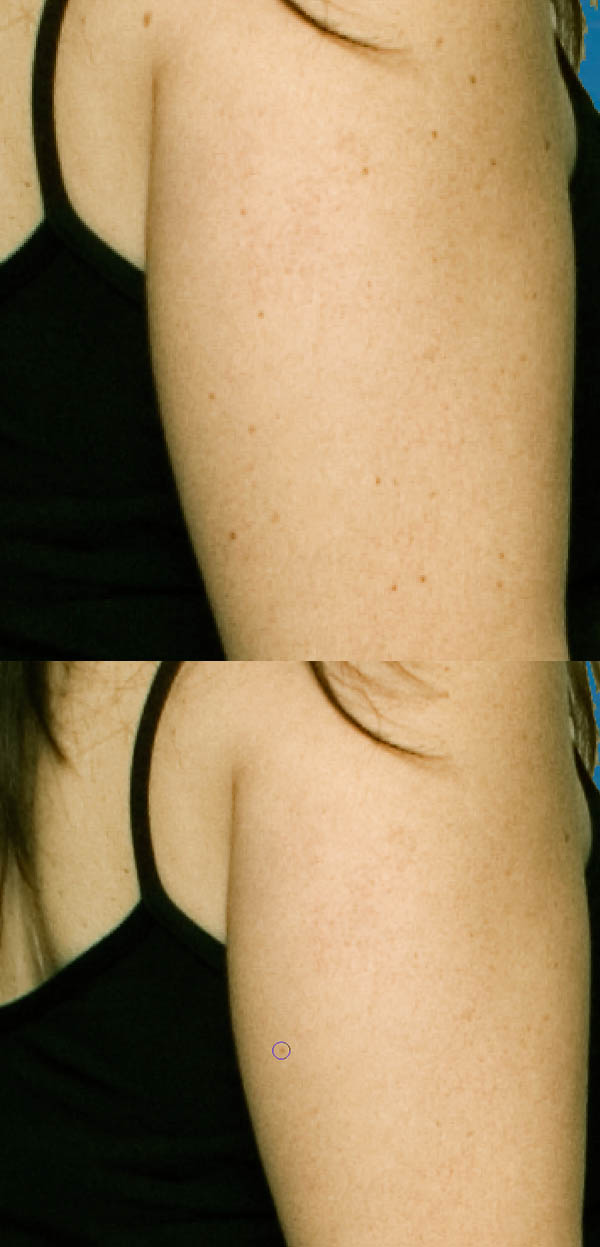
Now use the Healing Brush Tool (J) to erase the details on the girl skin that you don't like (marks, moles, etc...). Just search for a clean zone of the skin, press Alt and click with the left button mouse button. Then release Alt and click over a mark/mole and it erase.
- Spoiler:
Step 7
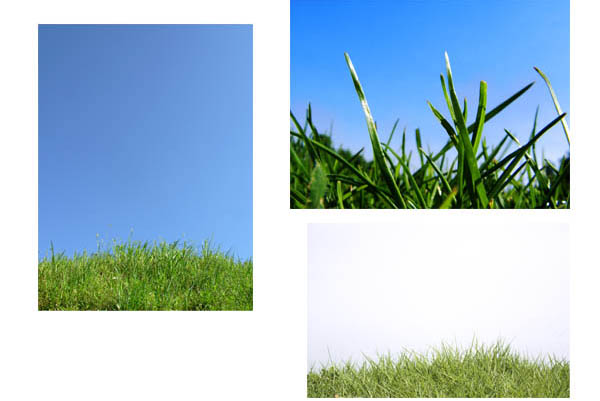
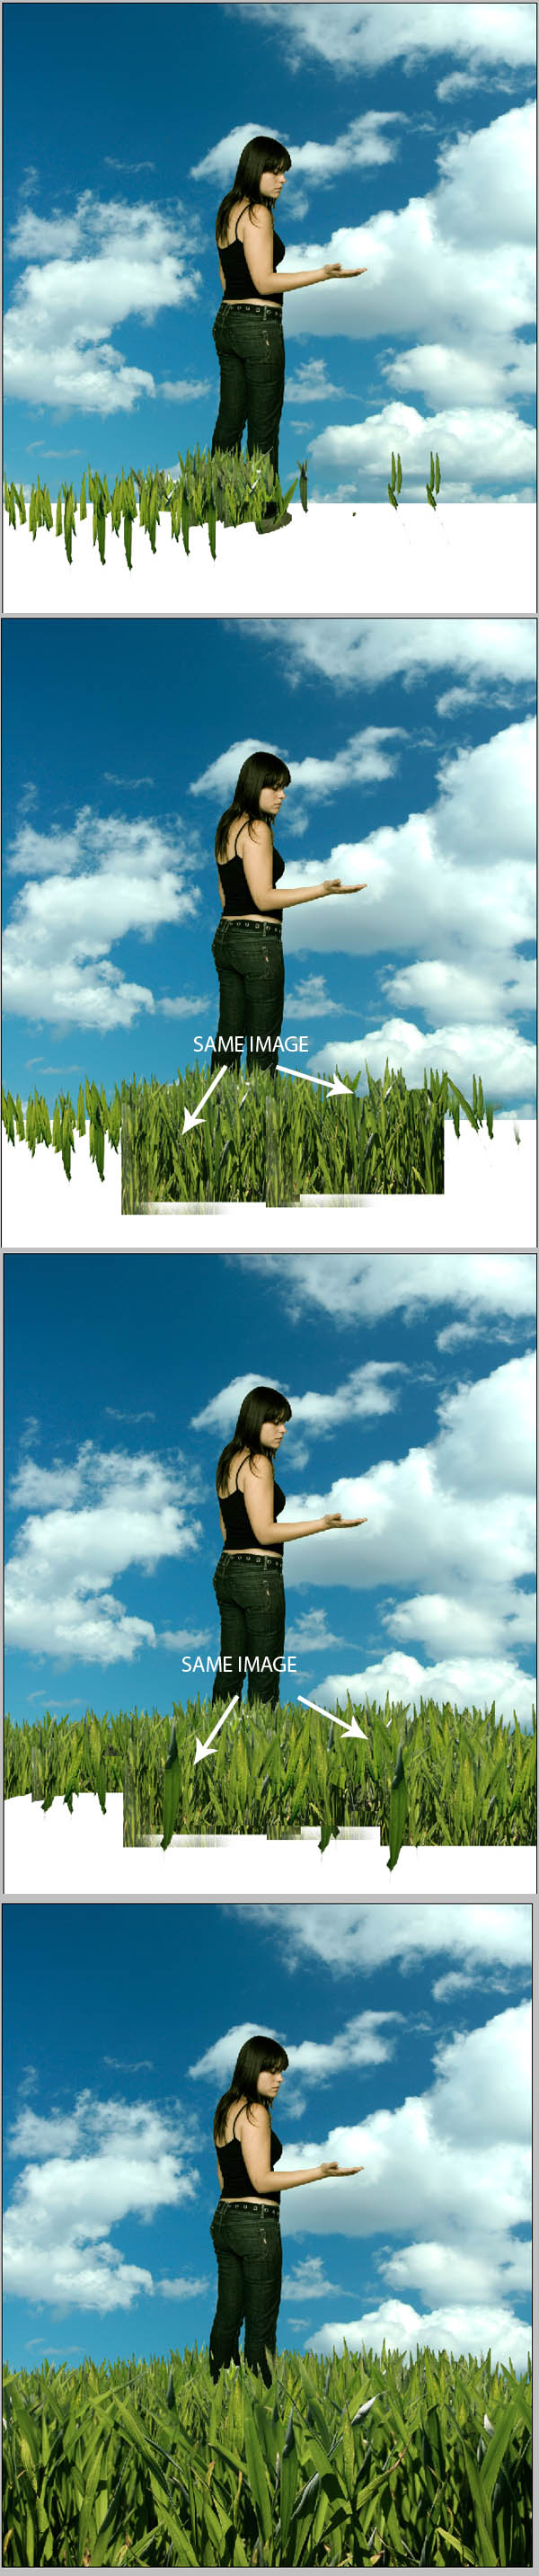
Let's work on the ground now. Search for some grass photographs, like the ones that I show below. I used these grass images: 1, 2, 3, and 4. Next, cut a line of grass out carefully. It's important to use images with quality that don't look blurred because some of them will be close-up in our final illustration. Use all the time that you need, and the Eraser Tool with a harder edge, to get the best selection possible.
When you paste a selection in our image, use Color Balance (Image > Adjustments > Color Balance) and Levels (Image > Adjustments > Levels) to match the different colors and lights. Basically, you need to add yellow/blue or magenta/green depending of the image you are using.
- Spoiler:
Step 8
We're going to place layer over layer to make credible grass. Some of the layers will not be very visible so don't worry if you repeat the same selection in different parts of the image. For the last line of grass (the closest to our eyes) we'll need an image with good quality and definition. Cut it carefully and paste it over all the other layers.
Use a line of grass behind the girl to join better in the grass. Finally, use little leaves to cover details and imperfections in the grass. It's important that you don't merge all the layers because we will need to introduce elements between some of them. This is an easy job, it doesn't require too much knowledge but you will need patience and good stock images. One last advice is don't use brushes to make elements like this, unless you're an absolute expert, as it will look bad and not photorealistic.
- Spoiler:
Step 9
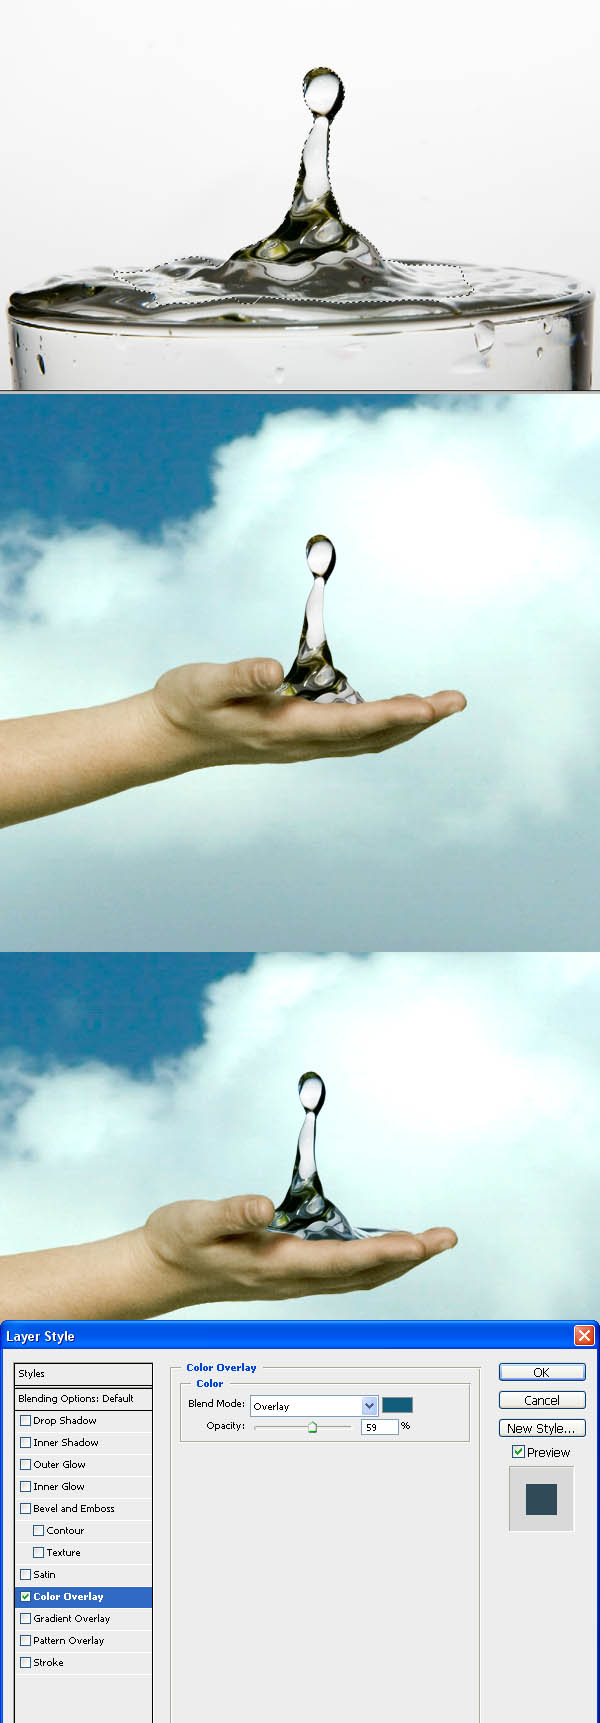
Let's go now for the water drop in the hand of the girl. As you can see, we have got a good stock image that doesn't need too much editing to get a good final look. That's the importance of the stock images that we use; the better they are, the less work we'll have to do on them in Photoshop.
Cut and paste it into our image behind the girl layer. Then use the Color Overlay option in Layer Style (Layer > Layer Style > Color Overlay) to make blue the green tones in our drop. Use the Overlay in Blend Mode, select a color similar to the one in the image and set the Opacity to 59%.
- Spoiler:
Step 10
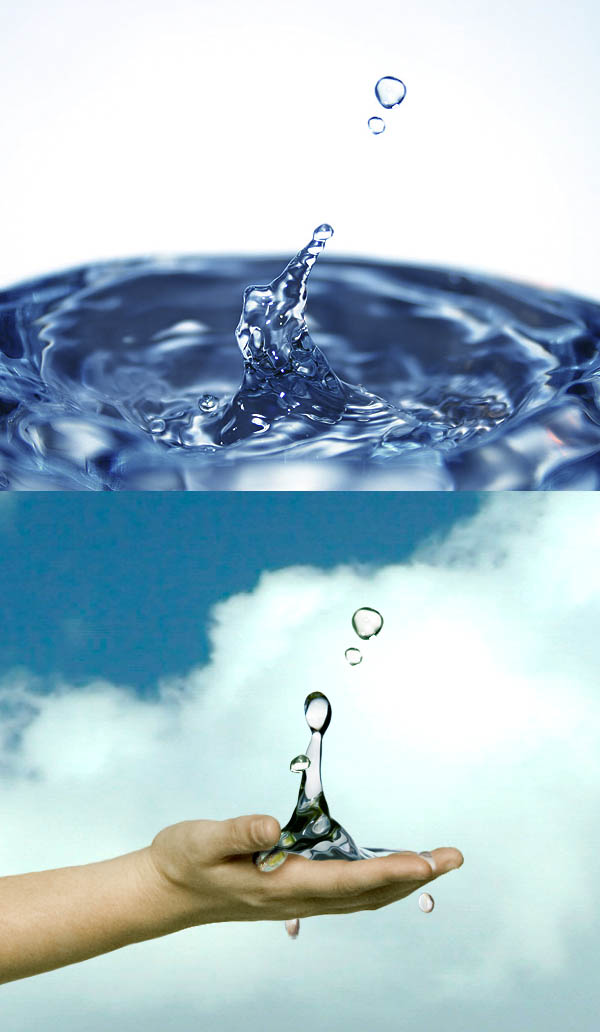
Now let's add some more drops floating and falling from the hand. Use photographs from drops that have a white or blue background to get a perfect match with our cloudy background. I used this image.
- Spoiler:
Step 11
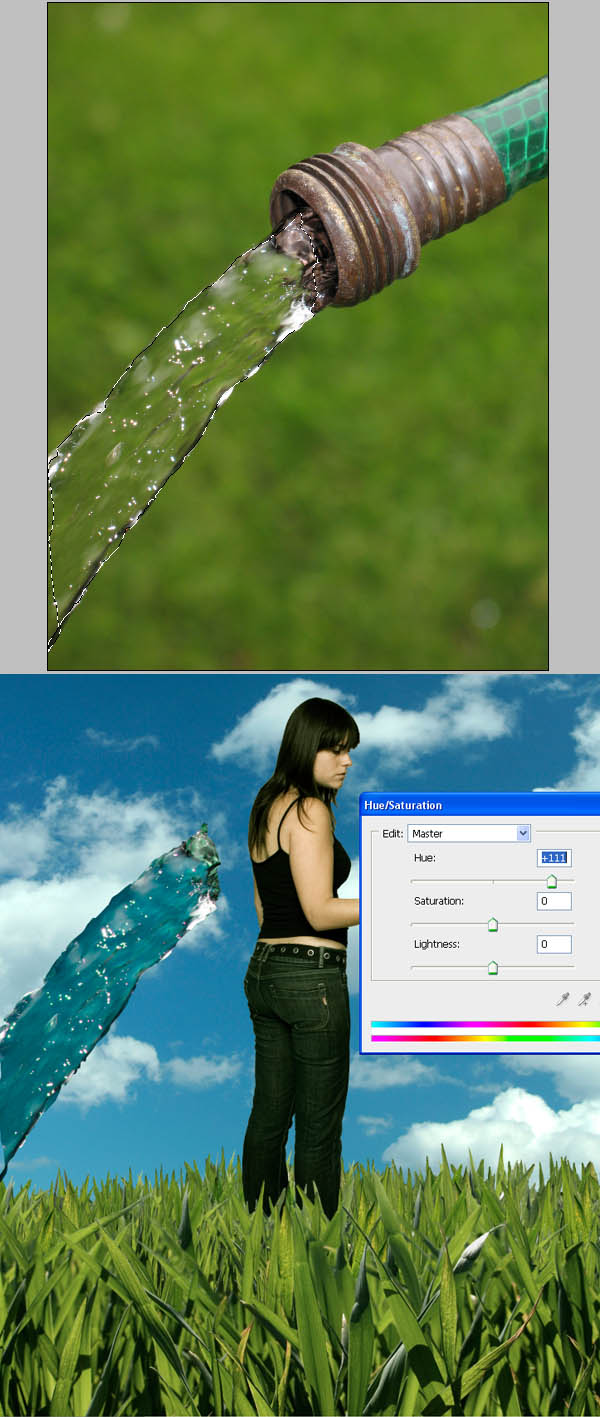
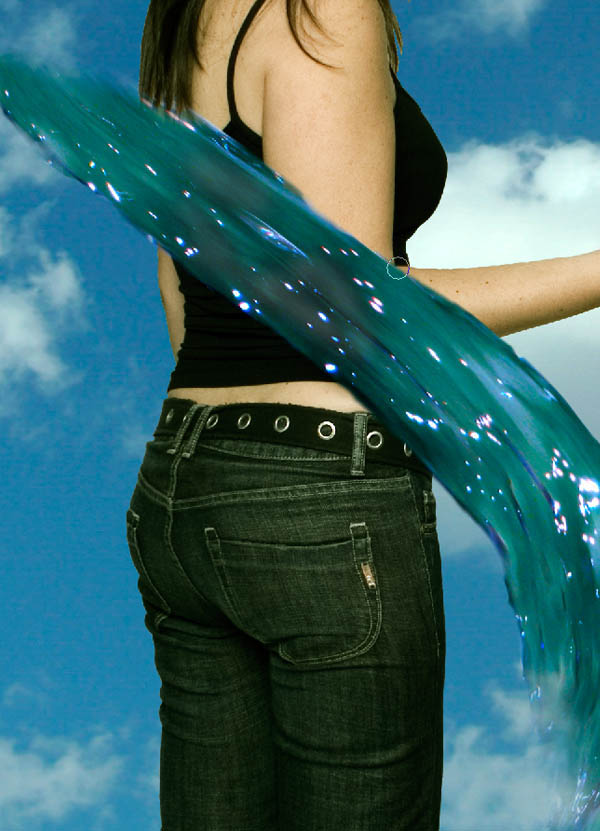
It's time to create some water spirals. One more time we need a good stock image that can be used as we want. This time we will use the water falling from a hose. Select it and paste in our image. Now go to Image > Adjustments > Hue/Saturation and change the Hue to +111.
- Spoiler:
Step 12
Now go to Edit > Free Transform (Command + T) and move the water to the position in the sample and go to Edit > Transform > Warp. With this mesh you can distort the object to make it twist.
- Spoiler:
Step 13
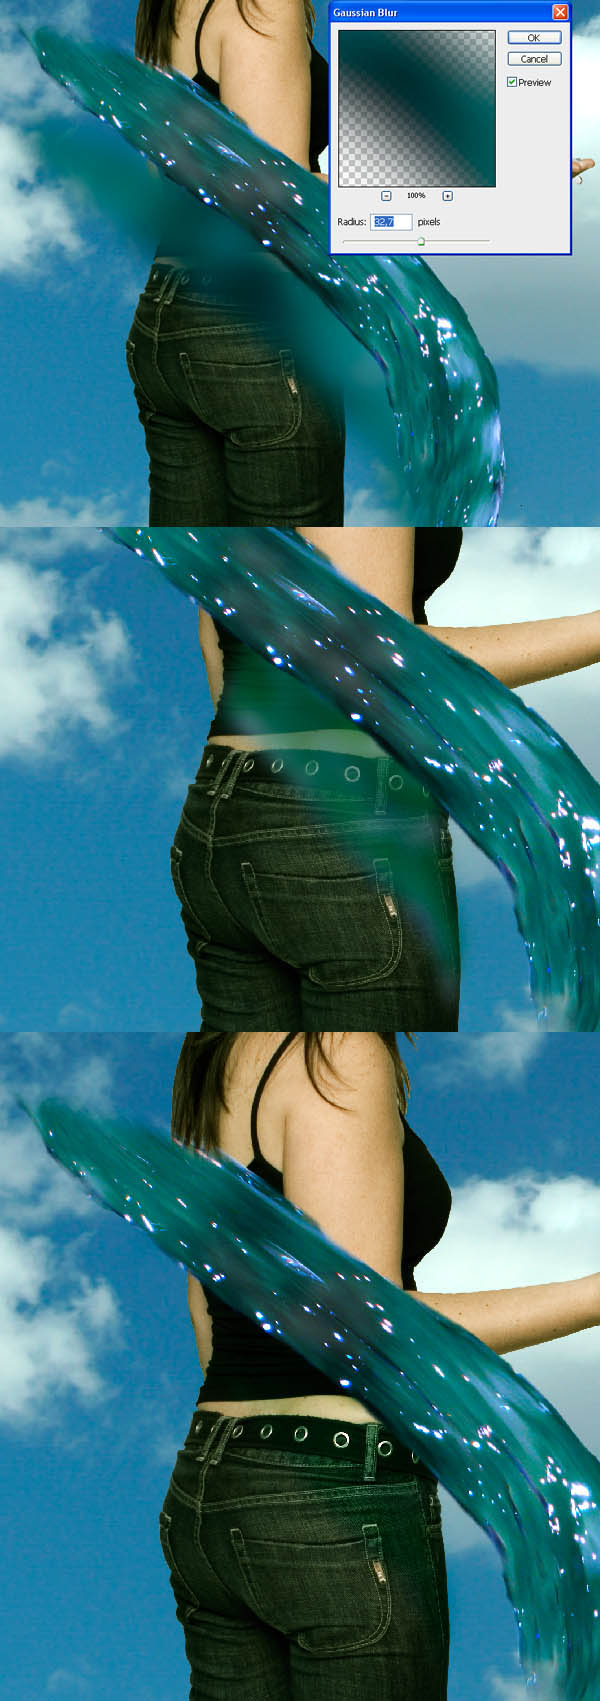
Once you have got a look similar to the image below, use the Blur Tool (R) on the edges of the water to make it blurred. You can use a subtle motion blur if you want too (Filters > Blur > Motion Blur).
- Spoiler:
Step 14
Duplicate the water layer and move down the lower one. Apply a Gaussian Blur (Filters > Blur > Gaussian Blur) with a Radius of about 32 pixels. Now use the Eraser Tool (E) to delete the blur that doesn't fall over the body of the girl. Add some green and yellow using Image > Adjustments > Color Balance and finally change the kind of layer from Normal to Soft Light.
- Spoiler:
Step 15
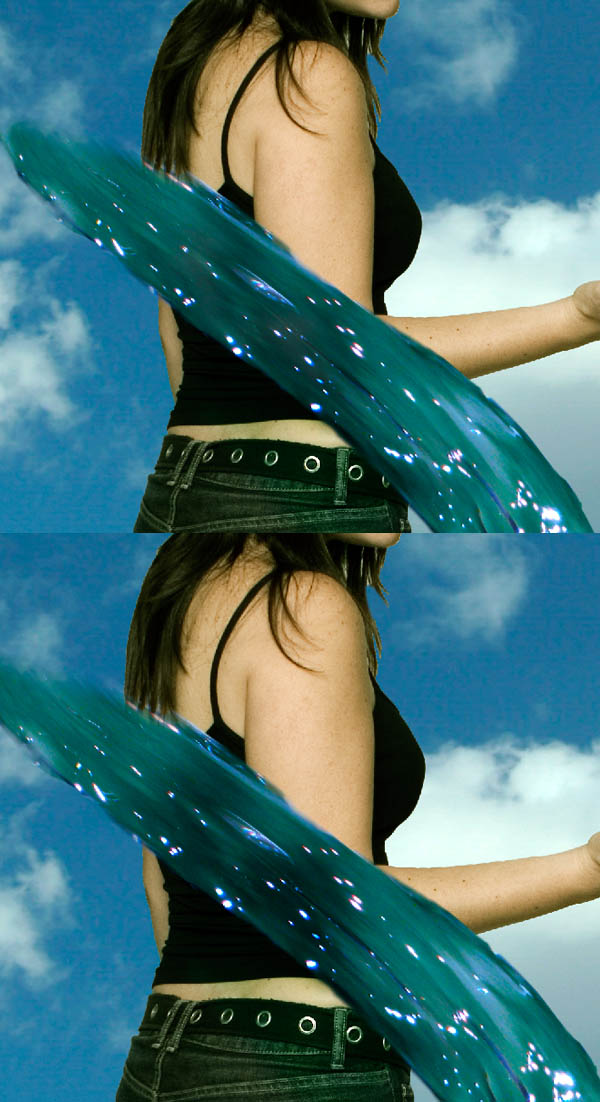
Use the Burn Tool with an exposure of about 40% over our "water" layer, creating some shadows on different zones.
- Spoiler:
Step 16
This will be easy. Duplicate the "water" layer again and use Free Transform (Command + T) to move it into the position shown below. Move it between some of the grass layers, like it is jumping and running.
- Spoiler:
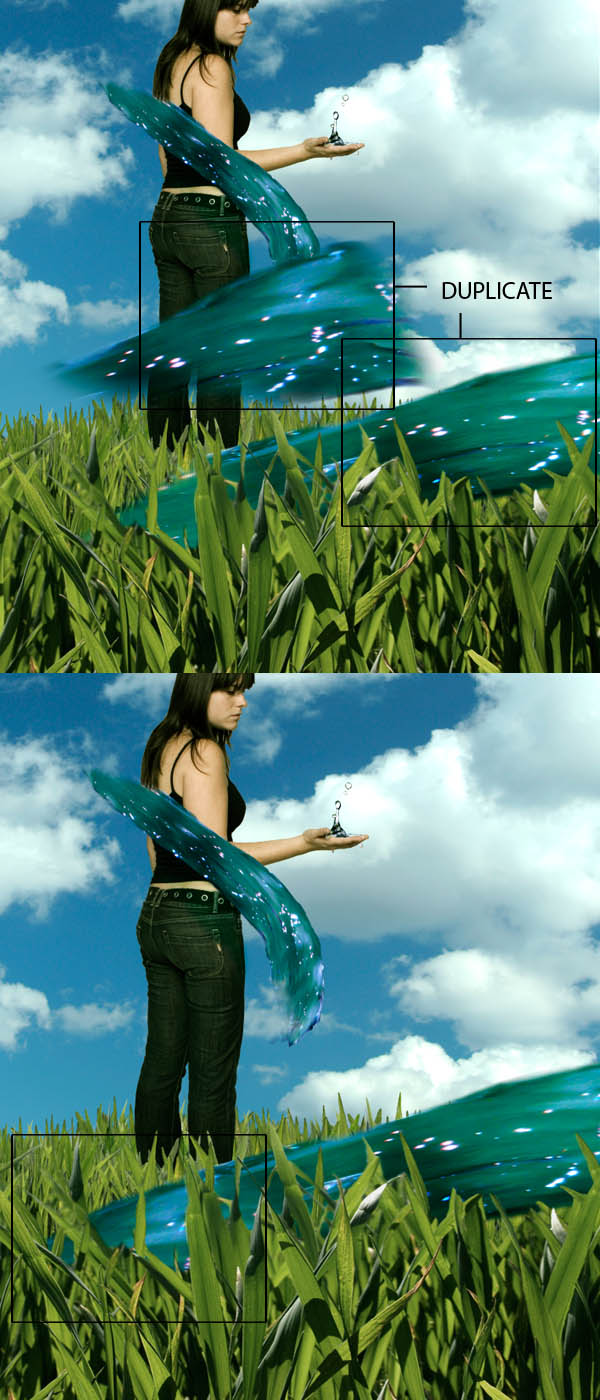
Step 17
Duplicate the "water" layer one more time. This time we are going to make the new layer bigger and move it closer to the viewer's position (between the "grass" layers again).
- Spoiler:
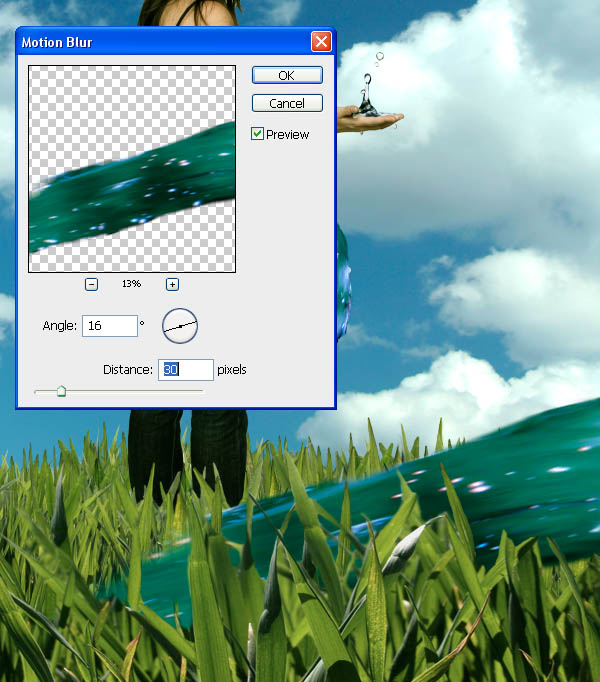
Step 18
In this last layer, add a motion blur. Go to Filters > Blur > Motion Blur and set it to an Angle of 16 and about 30 pixels of Distance.
- Spoiler:
Step 19
Copy and paste a piece of the water stream to improve the end of this water stream, as shown below. Then move it to the zone near the grass and use the eraser or a layer mask to make the union perfect.
- Spoiler:
Step 20
Now let's add some details. Cut some blades of grass and use motion blur on them to emulate the effect of moving, then place them around the water steam. Next, create some little white spheres with the Ellipse Tool and apply motion blur again. These are shinning drops that I can paste here and there to make the stream a little more personalized.
- Spoiler:
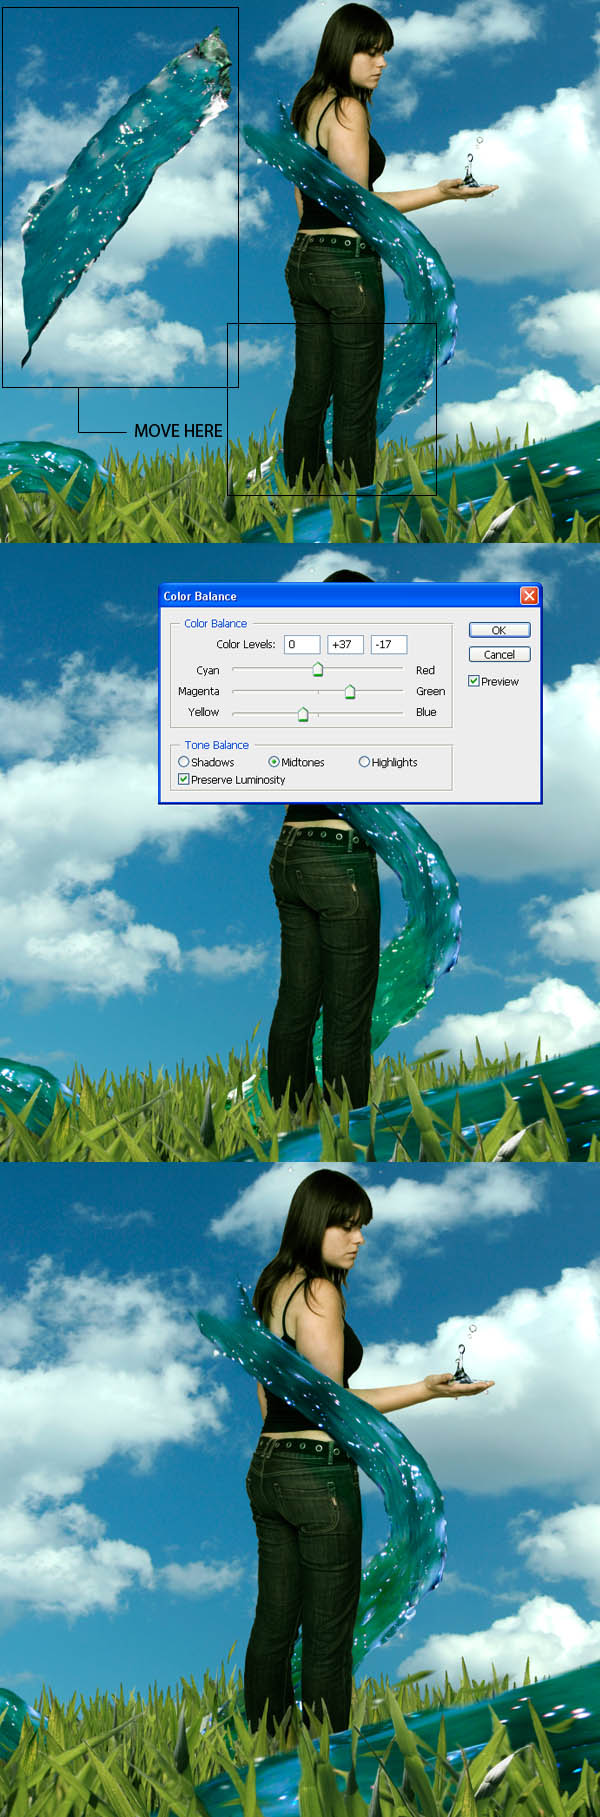
Step 21
Now let's use the original water stream again. Move it with the Free Transform (Command + T) to the position in the image, then use the Eraser or a Layer Mask to merge the edges of the two stream layers. Go to Image > Adjustments > Color Balance and use the Colors Levels that you can see in the image below. Finally, use the Burn Tool and Dodge Tool to add some shadows and highlights to the stream. What we've done is added some green to the water, like it was reflecting the color from the grass.
- Spoiler:
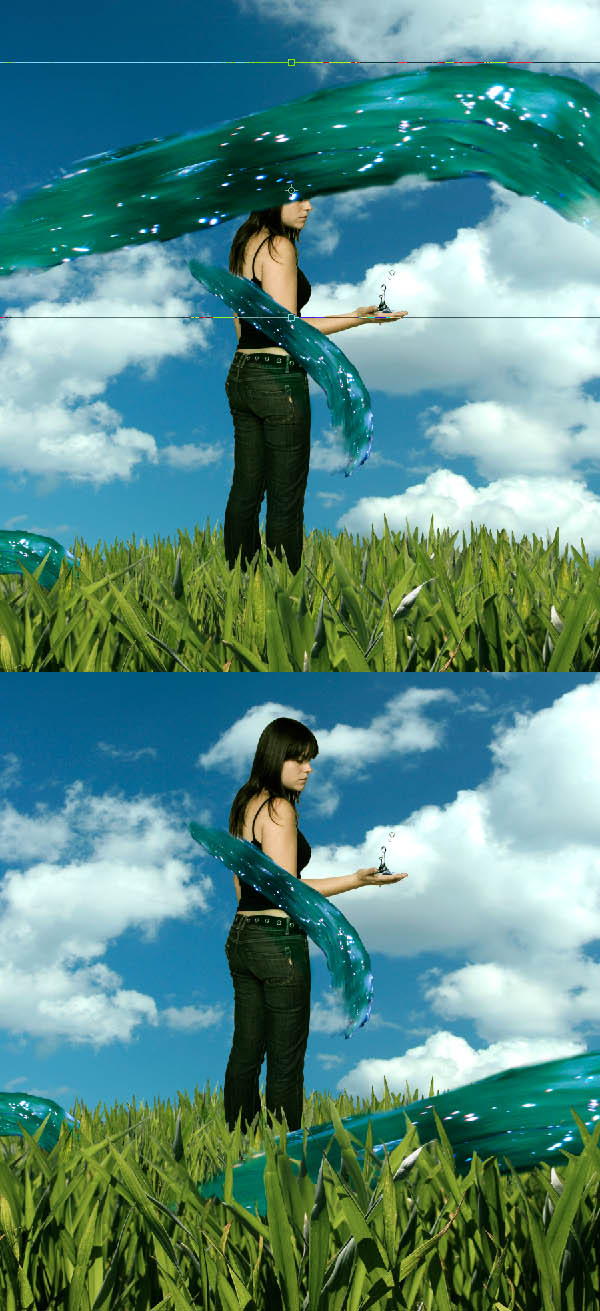
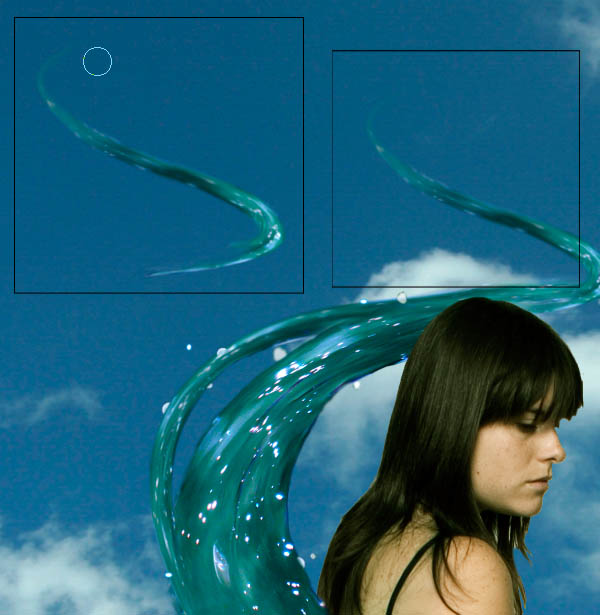
Step 22
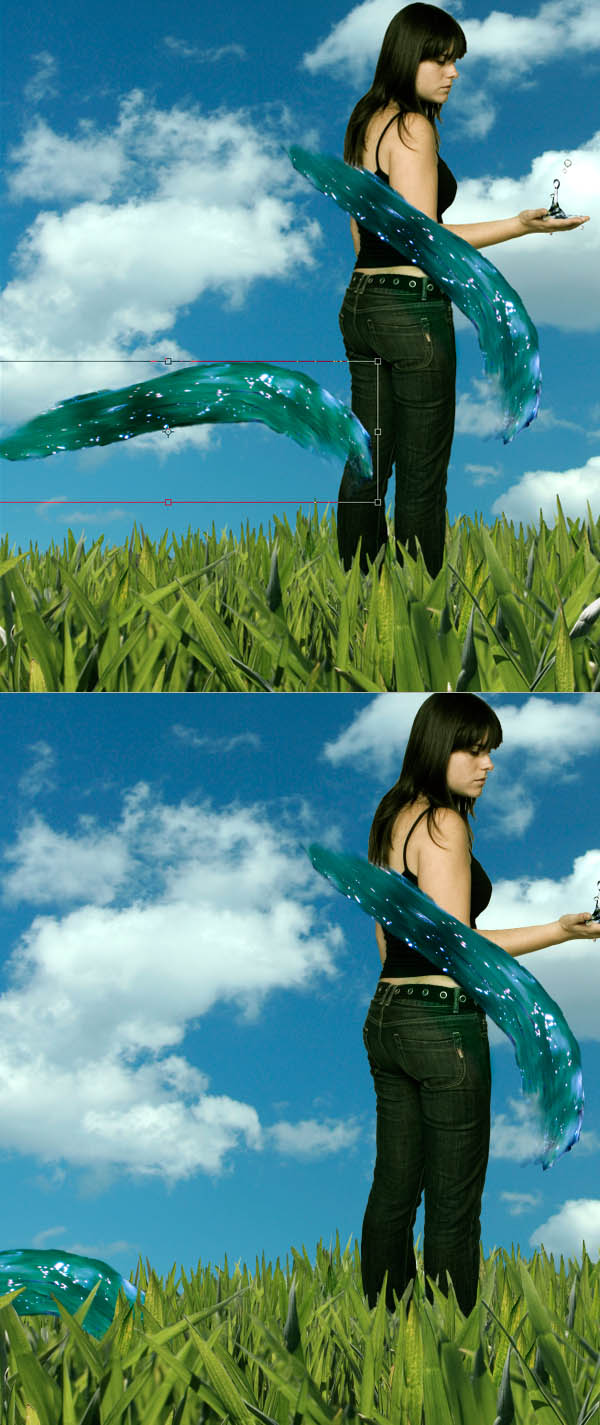
Let's use a copy of the original water stream again. Go to Edit > Transform > Warp to modify the selection as shown. Then move it into the position in the second sample image below. Finally, add some more drops and shines as we've done before.
- Spoiler:
Step 23
Let's use the original water stream >. Use Free Transform (Command + T) to modify the selection like in position (2). Then use Edit > Transform > Warp to get the stream like in position (3). Add drops and shines again. It's easy; as you can see we're just repeating all that we've done in previous steps.
- Spoiler:
Step 24
There's nothing new here. Repeat the previous step and modify the selection with Edit > Transform > Warp to get the stream that you can see in the sample below.
- Spoiler:
Step 25
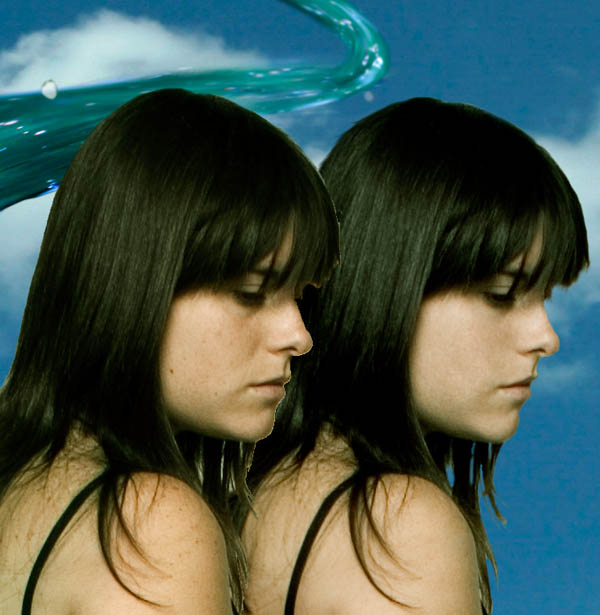
Let's work on details now. Select the layer of the "girl." Use your Eraser or one Mask Layer to improve the selection of the girl. Use it carefully in the hair. Then use the Healing Brush Tool as discussed in Step 6 to correct the final details. As you can see in the image below, the girl on the left is the original girl image, and the one on the right is the final version.
- Spoiler:
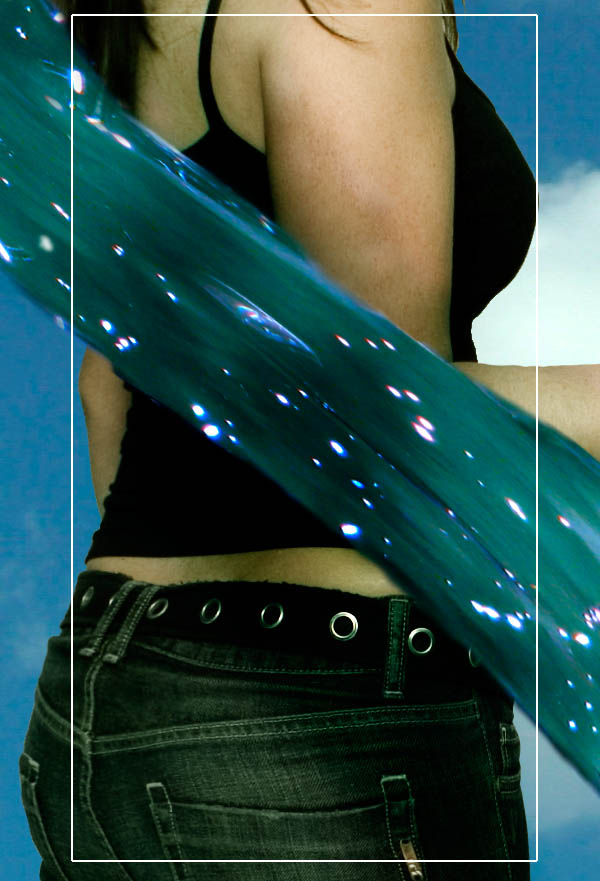
Step 26
We're still on the "girl" layer. Select the Burn Tool, and with Range in Midtones and Exposure about 25%, and use it on the places where the shadows of the water fall. Use the sample image below as a guide.
- Spoiler:
Conclusion
Personally I like the colors and light. But I invite you to use Adjustments Layers to modify and change them as you want. Go to your upper layer and then go to Layer > Adjustments Layers > Levels (for example); modify it as you want to get your perfect image. You can make the same with Color Balance, Curves, etc...
- Spoiler:
[img]http://psdtuts.s3.amazonaws.com/244_Water_Twist/27.jpg[/img
]
woooooot.... 
well done...:hahaha:
delete this topic if not belong irr...
tenkyu...

 Credits: Patient  http://psd.tutsplus.com/  | |
|
quick17
Silent Quick


Posts : 6163
Location : duon xD
Mood : thinking......
> : 
Contribution : Forum Warnings :
Reg. Date : 2009-07-09
Reputation : 127
Points : 37555
Pet :
| | Subject: Re: Create a Surreal Photo Manipulation with Twisting Water. Thu Sep 03, 2009 8:44 pm | |
| | |
|
Lady Pink :)
SH Bebii Gurl

Posts : 5070
Age : 27
> : I MISS YOU ! :3
Contribution : Forum Warnings :
Reg. Date : 2009-07-05
Reputation : 571
Points : 36806
Pet : 
| | Subject: Re: Create a Surreal Photo Manipulation with Twisting Water. Thu Sep 03, 2009 10:37 pm | |
| | |
|
dj :)
Promoter

Posts : 170
Age : 33
> : I love Sacred HOT
Contribution : Forum Warnings :
Reg. Date : 2009-08-15
Reputation : 346
Points : 26938
| | Subject: Re: Create a Surreal Photo Manipulation with Twisting Water. Fri Sep 04, 2009 7:32 am | |
| cool. thanks for this ate. | |
|
ethereal_bloo
SH Whiz

Posts : 57
Age : 32
Location : everywhere :]
Mood : bouncyy
> : no. I'm not bitter, you just won't let me go. Just admit it :)
Contribution : Forum Warnings :
Reg. Date : 2010-02-22
Reputation : 3
Points : 26143
| | Subject: Re: Create a Surreal Photo Manipulation with Twisting Water. Thu Feb 25, 2010 10:04 am | |
| | |
|
Sponsored content
| | Subject: Re: Create a Surreal Photo Manipulation with Twisting Water. | |
| |
|